Difference between revisions of "Krystalline Battle Guide"
Krystalline (talk | contribs) |
Krystalline (talk | contribs) |
||
| Line 23: | Line 23: | ||
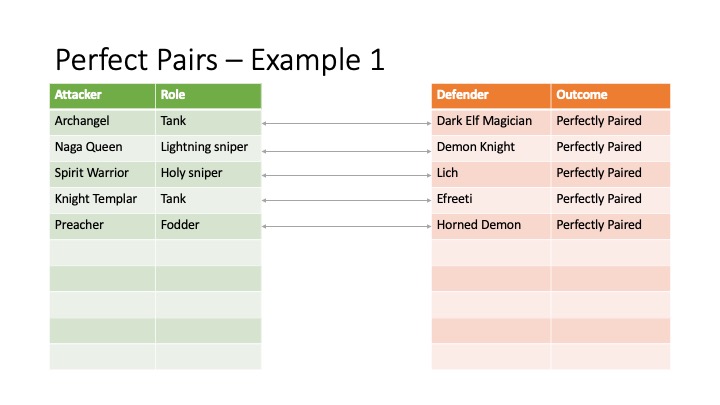
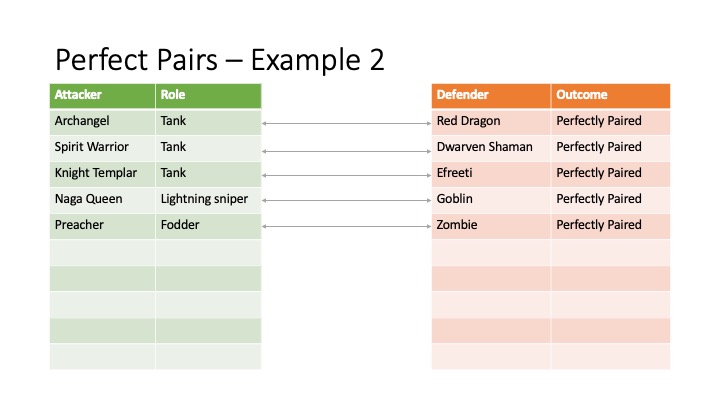
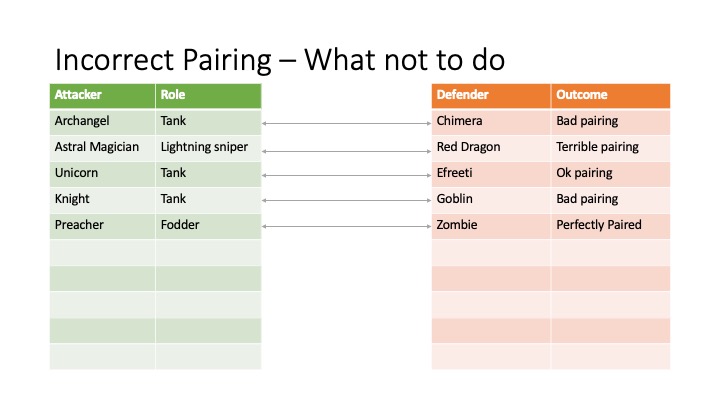
This is the most basic element of stacking which can single handedly win you fights without having to rely heavily on spells or items. The opportunity to perfectly pair may not always exist, especially if you don't know the opponent's stack. This is why sometimes you should work together with your team mates and allies to work out the stacking of the opponent. | This is the most basic element of stacking which can single handedly win you fights without having to rely heavily on spells or items. The opportunity to perfectly pair may not always exist, especially if you don't know the opponent's stack. This is why sometimes you should work together with your team mates and allies to work out the stacking of the opponent. | ||
| + | |||
| + | '''Study Material: Unit Favorable Matchups''' | ||
| + | |||
| + | <span style="color:#f1c40f;">''A perfectly paired matchup could mean that you are doing up to 10x as much damage to the opponent with the exact same amount of Net Power commitment''</span> | ||
#Click the unit that the defender is using | #Click the unit that the defender is using | ||
| Line 39: | Line 43: | ||
[[File:Perfect Pairs - Example 2.jpg|RTENOTITLE]] | [[File:Perfect Pairs - Example 2.jpg|RTENOTITLE]] | ||
| − | [[File:Incorrect Pairing.jpg]] | + | [[File:Incorrect Pairing.jpg|RTENOTITLE]] |
== Level 2 - The snipers == | == Level 2 - The snipers == | ||
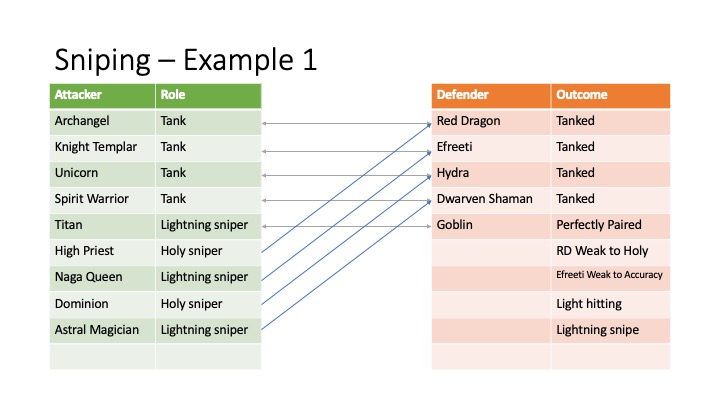
| − | Whilst some units don't always win | + | Whilst some units don't always win face to face, they can still do particularly well when "sniping" from afar. |
| + | |||
| + | '''Study Material: Unit Weaknesses''' | ||
| + | |||
| + | ''<span style="color:#f1c40f;">Sniping allows you to do damage to units where you could not otherwise have found a perfect pair without making wholesale changes to your stack. A good snipe or two of stacks can single handedly win you the battle.</span>'' | ||
| + | |||
| + | All unmatched units beyond the initial pairing are re-matched from top to bottom. | ||
| + | |||
| + | #Take a view on the "depth" of the opponent's stack. The shallower/shorter their stack, the more likely you will be able to snipe certain units without investing into very much. | ||
| + | #Pair your "snipers" against the opponent's weaknesses | ||
| + | #Collect land | ||
| + | |||
| + | Examples | ||
| + | |||
| + | [[File:Sniping Example 1.jpg|RTENOTITLE]] | ||
| + | |||
| + | [[File:Sniping Example 2.jpg|RTENOTITLE]] | ||
| + | |||
| + | [[File:Sniping Example 3.jpg|RTENOTITLE]] | ||
== Level 3 - The positional fight == | == Level 3 - The positional fight == | ||
| + | |||
| + | The positional fight revolves around understanding the distribution of NP % of the armies that engage. By utilising the efficient positioning of units, you can further enhance your favorable matchups whilst reducing your tanking commitments. | ||
| + | |||
| + | '''Study Material: Basic Arithmetic and Unit Attributes''' | ||
| + | |||
| + | <span style="color:#f1c40f;">''Positioning allows you to distribute and organise the NP % of your stack to emphasise on their respective roles. By reducing your commitment to NP % for tanks, you can increase your commitment to NP % for snipers or favorable trades.''</span> | ||
| + | |||
| + | Position Coefficients: | ||
| + | |||
| + | *A unit WITH a Ranged Primary Attack receives NO positional coefficient | ||
| + | *A unit WITHOUT Flying or a Ranged Primary Attack receives a 1.5x positional coefficient | ||
| + | *A unit WITH Flying receives a 2.25x positional coefficient | ||
| + | |||
| + | [[File:Position Examples.jpg|RTENOTITLE]] | ||
| + | |||
| + | Engagement Rules: | ||
| + | |||
| + | *Only Flying and Ranged units can attack Flying units | ||
| + | *Ranged units that attack a flying unit do <span style="color:#e74c3c;">NOT</span> suffer from [[Siege|Siege]] Penalty | ||
| + | *Non-Flying/Non-Ranged units <span style="color:#e74c3c;">ALWAYS</span> suffer from [[Siege|Siege]] Penalty | ||
| + | *Units are paired from top to bottom | ||
| + | |||
| + | | ||
| + | |||
| + | Examples | ||
| + | |||
| + | [[File:Position Example 1.jpg|RTENOTITLE]] | ||
| + | |||
| + | In the above example, the Attacker efficiently achieves: | ||
| + | |||
| + | *Up to 50% LESS NP on the 1st stack of [[Archangel|Archangel]] to tank the [[Dark_Elf_Magician|Dark Elf Magician]] (Very efficient tanking for less NP commitment) | ||
| + | *Up to 125% MORE NP on the 2nd stack of [[Ice_Elemental|Ice Elemental]] to favorably trade with the [[Djinni|Djinni]] (Focused sniping on obvious wins) | ||
| + | *Up to 35% LESS NP on the 3rd of [[Bulwark_Horror|Bulwark Horror]] to tank the [[Mind_Ripper|Mind Ripper]] (Efficient tanking for less NP commitment) | ||
| + | *Up to 35% LESS NP on the 4th stack of [[Unicorn|Unicorn]] to favourably trade the [[Water_Elemental|Water Elemental]] (Efficient tanking for less NP commitment) | ||
| + | |||
| + | | ||
| + | |||
| + | [[File:Position Example 2.jpg|RTENOTITLE]] | ||
| + | |||
| + | In the above example, the attacker efficiently achieves: | ||
| + | |||
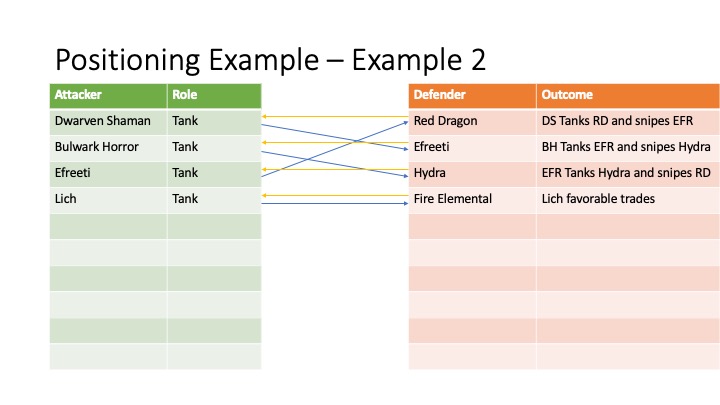
| + | *Up to 35% LESS NP on the 1st stack of [[Dwarven_Shaman|Dwarven Shaman]] to tank [[Red_Dragon|Red Dragon]] whilst having a reasonable hit on defender's [[Efreeti|Efreeti]] (Since they can not attack flyers and therefore must go for the next available ground unit - [[Efreeti|Efreeti]]) | ||
| + | *Up to 50% LESS NP on the 2nd stack of [[Bulwark_Horror|Bulwark Horror]] to tank [[Efreeti|Efreeti]] whilst having a reasonable hit on defender's [[Hydra|Hydra]] (Since the defender's [[Efreeti|Efreeti]] has already been paired by the [[Dwarven_Shaman|Dwarven Shaman]], they must go for the next ground unit - [[Hydra|Hydra]]) | ||
| + | *Up to 125% MORE NP on the 3rd stack of [[Efreeti|Efreeti]] to tank [[Hydra|Hydra]] whilst having a favorable snipe on defender's [[Red_Dragon|Red Dragon]] (Since they have the ability to attack flyers, then they will hit the defender's 1st unpaired flyer - [[Red_Dragon|Red Dragon]]) | ||
| + | *Up to 50% MORE NP on the 4th stack of [[Lich|Lich]] to tank and favorably trade on defender's [[Fire_Elemental|Fire Elemental]] | ||
| | ||
| Line 51: | Line 118: | ||
== Level 4 - The sacrifice == | == Level 4 - The sacrifice == | ||
| − | | + | Sacrifices are typically used in deep stacks to counter short or mono stacked defenders. Sacrifices are efficient because the investment in summoning the sacrificial stacks is often less than summoning a perfect stack. |
| + | |||
| + | '''Study Material: Knowing the sacrifice units''' | ||
| + | |||
| + | <span style="color:#f1c40f;">''Sacrificial stacks are typically flying units such as Archangel, Djinni, Vampire, Chimera.''</span> | ||
| + | |||
| + | Identifying the sacrifice opportunity: | ||
| + | |||
| + | *Mono stacked enemies | ||
| + | *Enemies under the influence of Contract of the Soul | ||
| + | *Enemies with a heavy top stack units (Who are likely to use Ashes of Invisibility) | ||
| + | |||
| + | Example | ||
| + | |||
| + | [[File:Sacrifice Example 1.jpg|RTENOTITLE]] | ||
| + | |||
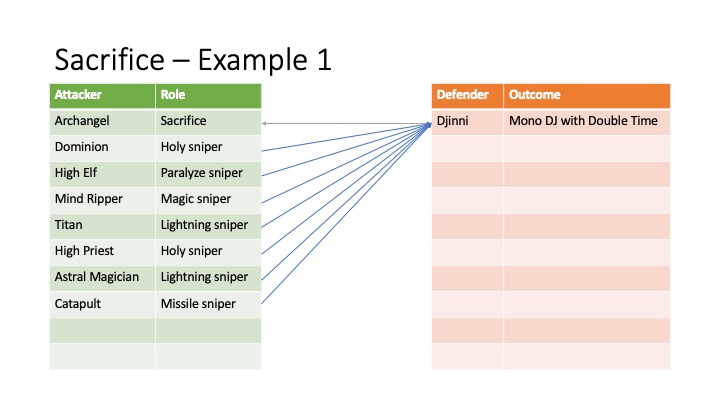
| + | In the above example, the defender's Mono [[Djinni|Djinni]] with [[Double_Time|Double Time]] as the most likely assignment is tanked by a light [[Archangel|Archangel]] (less than 10% of army NP) sacrifice stack. The balance of the attacker's stacks all have ranged hits on the Mono [[Djinni|Djinni]] stack and the attacker wins the battle by outdamaging the losses. | ||
| + | |||
| + | [[File:Sacrifice Example 2.jpg|RTENOTITLE]] | ||
| + | |||
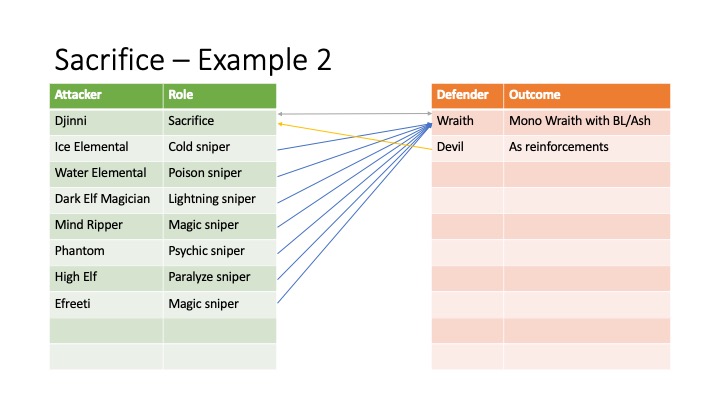
| + | In the above example, the defender's [[Wraith|Wraith]] with [[Battle_Lust|Battle Lust]] and [[Ashes_of_Invisibility|Ashes of Invisibility]] is the most likely assignment is tanked by a light [[Djinni|Djinni]] (less than 10% of the army) sacrifice stack. The balance of the attacker's stacks all have ranged hits on the Mono [[Wraith|Wraith]] stack and the attacker wins the battle by outdamaging the losses. | ||
| + | |||
| + | Note: The defender's [[Devil|Devil]] reinforcement also only engages with the attacker's [[Djinni|Djinni]] as well. | ||
== Level 5 - The reinforcements == | == Level 5 - The reinforcements == | ||
Revision as of 23:47, 10 October 2021
Contents
- 1 Krystalline's Battle Guide
- 2 Win Condition
- 3 Offense Tactics
- 3.1 Level 1 - The perfect pairs
- 3.2 Level 2 - The snipers
- 3.3 Level 3 - The positional fight
- 3.4 Level 4 - The sacrifice
- 3.5 Level 5 - The reinforcements
- 3.6 Level 6 - The assignments
- 3.7 Level 7 - The Uniques
- 3.8 Level 8 - The Spell Level
- 3.9 Level 9 - The Skills and Favors
- 3.10 Level 10 - The heroes
- 3.11 Level 11 - The intelligence
- 3.12 Level 12 - The shuffle
Krystalline's Battle Guide
Date: 4th October 2021
The purpose of this guide is to provide some very quick insights on how to win batles.
Win Condition
- You win an attack when you have killed more than 10% of the defender's army in Net Power; and
- You win an attack when you have killed more Net Power than your own losses; and
- Subject to scaling (Not going to talk about this just yet, as it is not really relevant to the bulk of your fights)
Offense Tactics
Level 1 - The perfect pairs
This is the most basic element of stacking which can single handedly win you fights without having to rely heavily on spells or items. The opportunity to perfectly pair may not always exist, especially if you don't know the opponent's stack. This is why sometimes you should work together with your team mates and allies to work out the stacking of the opponent.
Study Material: Unit Favorable Matchups
A perfectly paired matchup could mean that you are doing up to 10x as much damage to the opponent with the exact same amount of Net Power commitment
- Click the unit that the defender is using
- Choose from one of the recommended units to pair on a "tank and trades favorably" basis
- Repeat steps [1] and [2] at least 3 times (Idealy from top to bottom) to determine your attacking stack
- Attack using a "Regular" attack
- Select a spell from the "most consistent spells"
- Select an item from the "most consistent items"
- Cross your fingers
- Collect land
Examples
Level 2 - The snipers
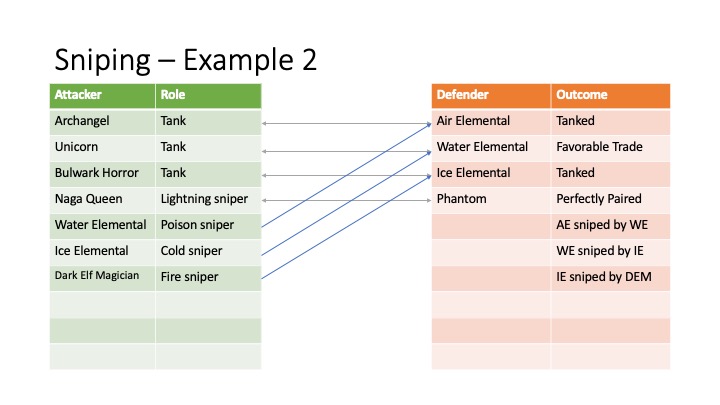
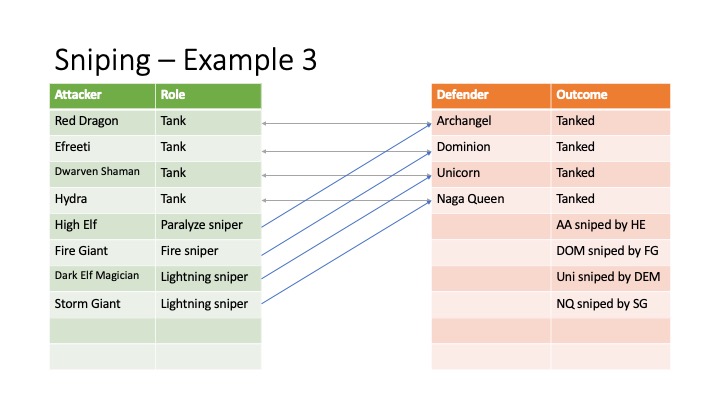
Whilst some units don't always win face to face, they can still do particularly well when "sniping" from afar.
Study Material: Unit Weaknesses
Sniping allows you to do damage to units where you could not otherwise have found a perfect pair without making wholesale changes to your stack. A good snipe or two of stacks can single handedly win you the battle.
All unmatched units beyond the initial pairing are re-matched from top to bottom.
- Take a view on the "depth" of the opponent's stack. The shallower/shorter their stack, the more likely you will be able to snipe certain units without investing into very much.
- Pair your "snipers" against the opponent's weaknesses
- Collect land
Examples
Level 3 - The positional fight
The positional fight revolves around understanding the distribution of NP % of the armies that engage. By utilising the efficient positioning of units, you can further enhance your favorable matchups whilst reducing your tanking commitments.
Study Material: Basic Arithmetic and Unit Attributes
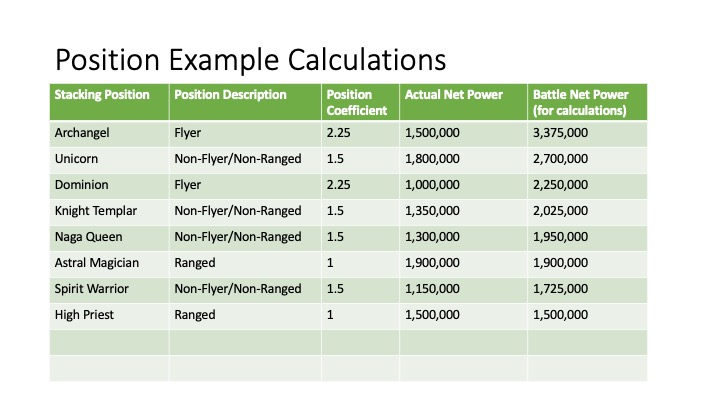
Positioning allows you to distribute and organise the NP % of your stack to emphasise on their respective roles. By reducing your commitment to NP % for tanks, you can increase your commitment to NP % for snipers or favorable trades.
Position Coefficients:
- A unit WITH a Ranged Primary Attack receives NO positional coefficient
- A unit WITHOUT Flying or a Ranged Primary Attack receives a 1.5x positional coefficient
- A unit WITH Flying receives a 2.25x positional coefficient
Engagement Rules:
- Only Flying and Ranged units can attack Flying units
- Ranged units that attack a flying unit do NOT suffer from Siege Penalty
- Non-Flying/Non-Ranged units ALWAYS suffer from Siege Penalty
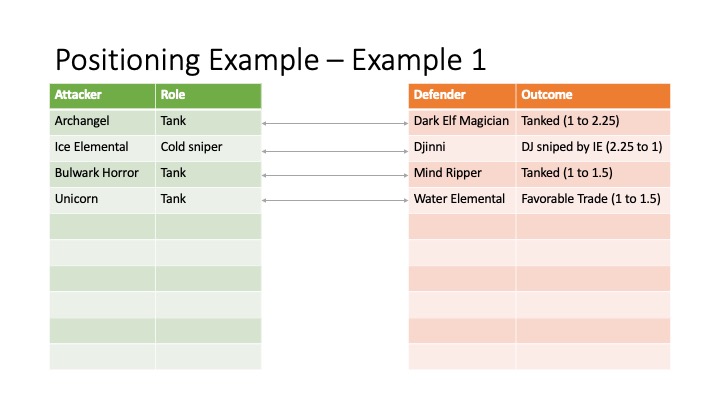
- Units are paired from top to bottom
Examples
In the above example, the Attacker efficiently achieves:
- Up to 50% LESS NP on the 1st stack of Archangel to tank the Dark Elf Magician (Very efficient tanking for less NP commitment)
- Up to 125% MORE NP on the 2nd stack of Ice Elemental to favorably trade with the Djinni (Focused sniping on obvious wins)
- Up to 35% LESS NP on the 3rd of Bulwark Horror to tank the Mind Ripper (Efficient tanking for less NP commitment)
- Up to 35% LESS NP on the 4th stack of Unicorn to favourably trade the Water Elemental (Efficient tanking for less NP commitment)
In the above example, the attacker efficiently achieves:
- Up to 35% LESS NP on the 1st stack of Dwarven Shaman to tank Red Dragon whilst having a reasonable hit on defender's Efreeti (Since they can not attack flyers and therefore must go for the next available ground unit - Efreeti)
- Up to 50% LESS NP on the 2nd stack of Bulwark Horror to tank Efreeti whilst having a reasonable hit on defender's Hydra (Since the defender's Efreeti has already been paired by the Dwarven Shaman, they must go for the next ground unit - Hydra)
- Up to 125% MORE NP on the 3rd stack of Efreeti to tank Hydra whilst having a favorable snipe on defender's Red Dragon (Since they have the ability to attack flyers, then they will hit the defender's 1st unpaired flyer - Red Dragon)
- Up to 50% MORE NP on the 4th stack of Lich to tank and favorably trade on defender's Fire Elemental
Level 4 - The sacrifice
Sacrifices are typically used in deep stacks to counter short or mono stacked defenders. Sacrifices are efficient because the investment in summoning the sacrificial stacks is often less than summoning a perfect stack.
Study Material: Knowing the sacrifice units
Sacrificial stacks are typically flying units such as Archangel, Djinni, Vampire, Chimera.
Identifying the sacrifice opportunity:
- Mono stacked enemies
- Enemies under the influence of Contract of the Soul
- Enemies with a heavy top stack units (Who are likely to use Ashes of Invisibility)
Example
In the above example, the defender's Mono Djinni with Double Time as the most likely assignment is tanked by a light Archangel (less than 10% of army NP) sacrifice stack. The balance of the attacker's stacks all have ranged hits on the Mono Djinni stack and the attacker wins the battle by outdamaging the losses.
In the above example, the defender's Wraith with Battle Lust and Ashes of Invisibility is the most likely assignment is tanked by a light Djinni (less than 10% of the army) sacrifice stack. The balance of the attacker's stacks all have ranged hits on the Mono Wraith stack and the attacker wins the battle by outdamaging the losses.
Note: The defender's Devil reinforcement also only engages with the attacker's Djinni as well.
Level 5 - The reinforcements
Level 6 - The assignments
Level 7 - The Uniques
Level 8 - The Spell Level
Level 9 - The Skills and Favors
Level 10 - The heroes
Level 11 - The intelligence
